
Hello fellow haxers! 🙂
The objective of this post is very simple – Understand how Core Isolation user setting affects the execution flow of driver loading. Enjoy reading. Feel free to ping me if i have made any mistakes in the post!
VBS& HVCI
- Virtualization based security/VBS is a very powerful feature on Windows platforms that utilizes virtualization technology to offer enhanced security that makes many traditional adversary tradecraft that targets kernel obsolete.
- People often confuse HVCI with VBS which is not the case, VBS is not Hypervisor-Protected Code Integrity/HVCI. HVCI comes under the VBS umbrella of security offerings.
- Idea behind HVCI is very straightforward, restricts execution of unsigned(un-verified) code in kernel memory by utilizing virtualization technology aka Windows Hyper-V hypervisor.
- Modern Windows operating system loads Secure kernel into memory after booting, it then loads normal windows kernel as virtualized containers. When the user logs into the machine, they are interacting with this normal kernel, the secure kernel is beyond the reach of normal kernel. This forms the basis of VBS. The Secure kernel acts as hypervisor between hardware and the normal kernel.
- Even if the user is able to get into kernel space as a result some vulnerable driver code, the secure kernel not accessible to the attacker.
- HVCI is built on top of this idea, it doesn’t allow user to execute unsigned code in the kernel space. This is implemented by making executable pages non-writable and writable pages non-executable. In an environment where the hypervisor (secure kernel) has the complete control of the memory, attacker cannot simply go and corrupt memory for example modifying page table entries to execute attacker’s shellcode in the kernel space.
- The VBS is achieved because of one key element called Second Level Address Translation/SLAT, Intel’s implementation of SLAT is Extended Page Table/EPT.
- I am not going to cover all details here in this post. Search keywords like Isolated User Mode/IUM, credential guard etc on Google to know more about VBS.
HVCI,DriverBlockList and Driver Load
- VBS is shipped as “Core-Isolation” settings on Windows as shown below. Memory Integrity is HVCI, Core isolation has many other features like kernel stack protection, memory access protection and Driver blocklist. When Memory integrity is enabled, all other features will be active. Users can enable driver blocklist despite of Memory integrity setting.

When driver blocklist is enabled, system prevents flagged drivers from loading in the kernel space. Below image shows loading of the Process Hacker’s driver getting blocked. A Program Compatibility Assistant greets the user with a warning, when memory integrity aka HVCI is enabled.

In this post, we will look into code to see where this check is enforced in the driver loading process.
Service Control & Service Control Manager
On Windows we rely on service control (sc.exe) to deploy a driver. Commands shown below help us to run a driver on the system.
sc create <service_name> binPath= path/to/driver.sys type= kernel
sc start <service_name>
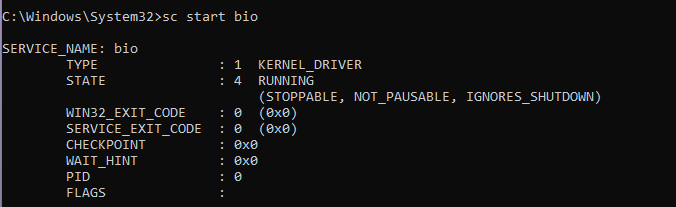
In this post we are using vulnerable BS_RCIO64.sys (D205286BFFDF09BC033C09E95C519C1C267B40C2EE8BAB703C6A2D86741CCD3E) to demonstrate integrity checks. When HVCI(or Driver BlockList) is disabled we can successfully deploy the driver as shown in the image below. The state is shown as running. This means the driver is successfully loaded into kernel space and is running waiting for IOCTLs to be issued by userland client program.
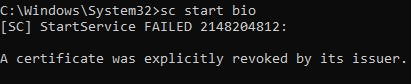
When HVCI (or Driver BlockList) is enabled, when we run the same service start command, now we are greeted with a different message as shown below. This is the result of signature verification. When memory integrity feature (HVCI) is turned on, it enables Driver BlockList. Driver BlockList feature restricts loading of any publicly known vulnerable drivers via signature validation.
I would like to point out Memory Integrity (HVCI) feature is not required to block such drivers from loading, by turning on Driver Blocklist list feature alone will give us the same result.
Reversing SC.exe
- The motivation for this post is to understand the execution flow and find out where exactly in the chain the “block list” check is enforced. The best place to start is service control binary aka “sc.exe”.
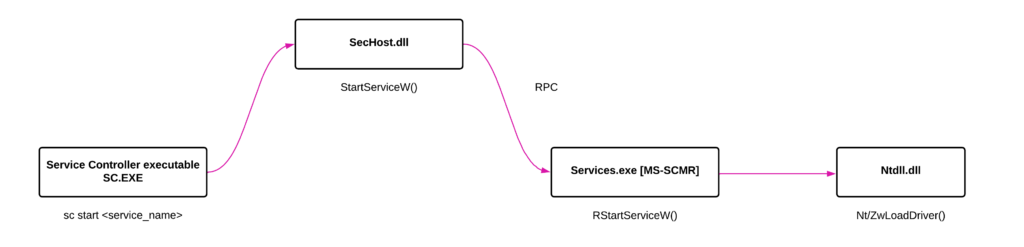
- The above image summarizes the whole execution chain which starts from sc.exe and ends in ntdll.dll.
- When we pass “start” argument to sc.exe, it calls StartServiceW implemented in SecHost.dll.
- Interestingly StartServiceW invokes an RPC method RStartServiceW in Services.exe. Finally the RStartServiceW calls native api Zw/NtLoadDriver in ntdll.dll.
The image below shows the disassembled code of sc.exe where all its functionalities are implemented. It is in one of the worker thread routines, take a look at the name of the function in the function window – “worker”.

We are only interested in the argument “start”, the associated logic is shown below. We can see a call to StartServiceW. We can now leave everything else and go and examine this api.
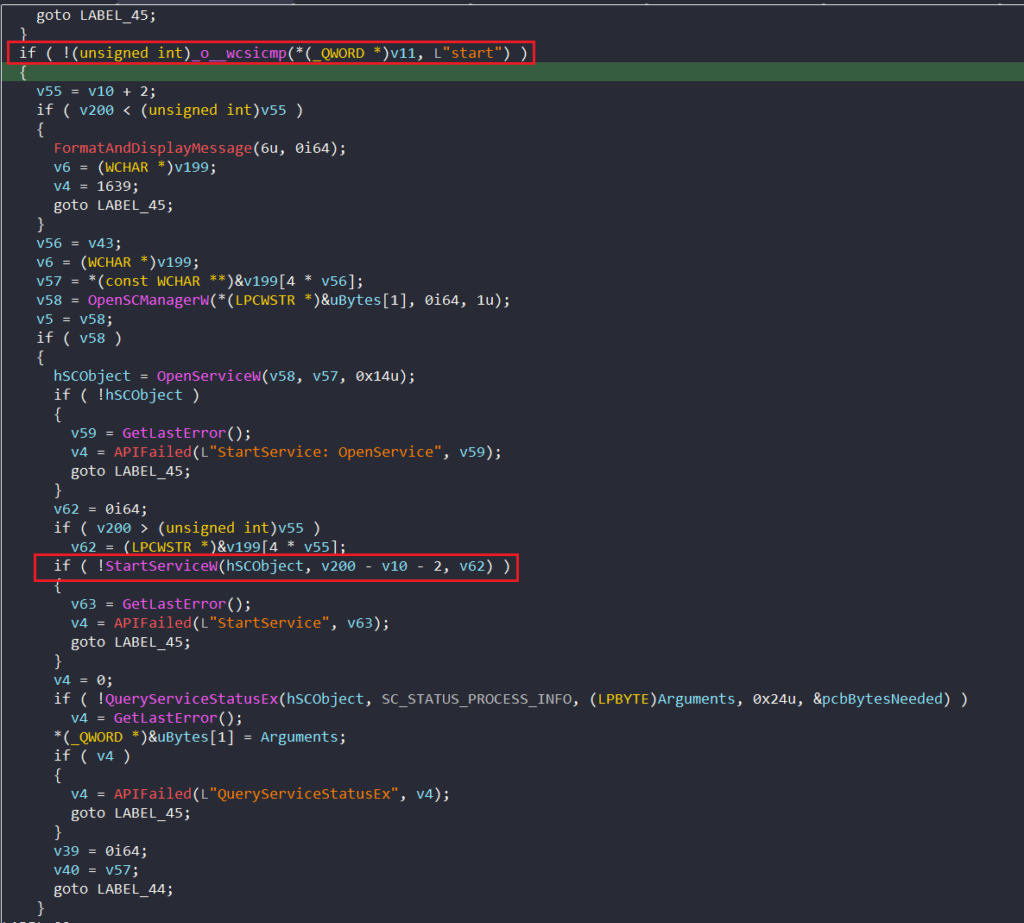
After doing some basic analysis, it is very easy to find out the module where StartServiceW is implemented. The function is imported form SecHost.dll and the decompiled code is shown below.
The routine is very straightforward, a simple RPC call via NdrClientCall2.

The RpcInterfaceInformation member in PMIDL_STUB_DESC(first argument passed to NdrClientCall2) will give us GUID of the RPC server. The GUID is shown in the image below.
The GUID is 367ABB81-9844-35F1-AD32-98F038001003, which is very well known interface id for Service Control Manager Remote(MS-SCMR). This is implemented in PPL process services.exe.

Lets dig into services.exe.
Debugging Services.exe
Lets take a pause and let me tell you one important thing. From here onwards we are going to debug and analyze a PPL process. I am not going to cover how to debug such processes in much detail in here. My go to method is to unprotect the protected process by modifying Protection member in EPROCESS structure from kernel via a Local Kernel debug session.
un-Protected Process
Follow below points to un-protect a PPL’ed process.
Obtain a local kernel debug session on the host as shown below. Notice the prompt is “lkd”.

Now issue !process command to examine the EPROCESS block of the services.exe. It is located is at 0xffffb50dd5e4a080.

Lets examine the Protection member by executing dt command as shown below. keep a note of the offset where the member is residing, in our case the member is at 0x87a from the base 0xffffb50dd5e4a080. You can expand the protection member in the console and see the members within Protection – Type, Audit and Signer. We need to change the value to Zero
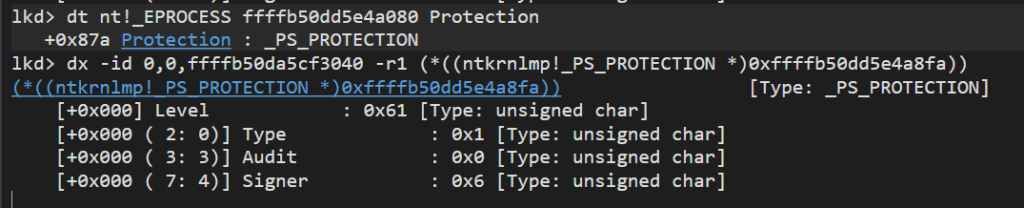
You can also get the value of as shown below by executing below command shown in the image below. The same value 0x61.

Lets set the value of Protection to 0. Execute eb command as shown below.

Lets check if it worked, yup now the value is 0 as shown below.

Now we can easily attach our favorite debugger and start analyzing the services.exe.
Tracing Functions
- Attach debugger to the services.exe now running as non-PPL process.
- Put a break point on RServiceStartW function.
- Simply execute sc.exe start <service_name> in an elevated prompt.
- We will hit our breakpoint set in services.exe.
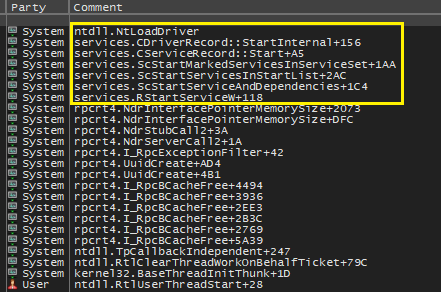
After spending sometime analyzing the execution flow, we obtain a complete trace of the functions(callstack) invoked as shown in the below . The call ends in Nt/ZwLoadDriver api implemented in the ntdll.dll.
Function Call Boundary
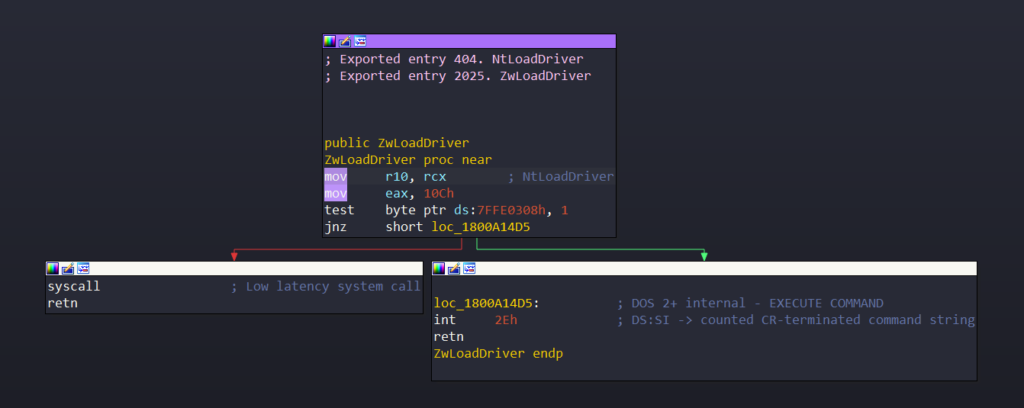
The disassembly of the ZwLoadDriver is shown below. We have reached the end of user mode space. We cannot go further with our debugger. All the heavy lifting, from integrity check to actual loading of the driver code, is done by the code in the kernel. So we need to step into kernel to understand the process.
Lets the start debugging the kernel and trace the function calls from ZwLoadDriver.
All The Way Leads to Kernel
When we step into Windows kernel, we can see few interesting routines getting called. First we need to trace functions that are responsible for validating the signature, after all we are doing all this to find where signature enforcement/validation is happening right?
Tracing Functions
I am a big fan of remote kernel debugging using kdnet. If you dont know about kdnet then check this post from iredteam to setup the environment.
After spending some time in debugger, I have been able to pick up an interesting execution flow that leads to a very promising function SeValdiateImageHeader, from the function name (thanks to symbols!) it is obvious, this is where validation is enforced. One important point to note is that you get this callstack when DriverBlocklList is enabled (or memory integrity is enabled).

If we try to load a blacklisted or publicly known vulnerable driver, the return value form SeValidateImageHeader is as shown in the image below. The NTSTATUS code – C0000603

We can use !error command in WinDBG to get the description as shown in the image below. The description says – “Windows cannot verify digital signature for this file. The signing certificate for this file has been revoked“

As researchers we love Windows for one big reason LOL, their decision making logic relies on a return value. So as an attacker we can simply manipulate return value to have some fun. Yep I am talking about bypassing signature enforcement/validation. This issue is covered in more details in Adam Chester aka XPN‘s blog here.
I am not interested in the bypass, rather I just want to know how user configuration(VBS/Core Isolation settings) affects the control flow of execution in the kernel.

- Above image shows the disassembled code of MiValidateSectionSiginingPolicy.
- You can see in the function there is a call made to MiValidateSectionCreate. Before the call there is a condition check. This is where the system retrieves the user configuration (DriverBlockList) and check if it is enabled.
- If the DriverBloclList is enabled, MiValidateSectionCreate is called which will call SeValidateImageHeader as shown in the call stack previously. Thus preventing our driver from loading
- If the setting is disabled, MiValidateSectionCreate simply return NTSUCCESS (0x000000) and MiValidateSectionCreate is never called. This will let us load the driver.
The same code for the condition check in the debugger is shown below

Thats all folks!
Leave a Reply